Address Book and Whitelisting еxplained
In this article:
Address Book
1. Overview
2. How to access the Address Book
3. How to add a new crypto address
4. How to edit an existing crypto address
5. How to remove a crypto address
Whitelisting
1. Overview
3. How to disable Whitelisting
Address Book
1. Overview
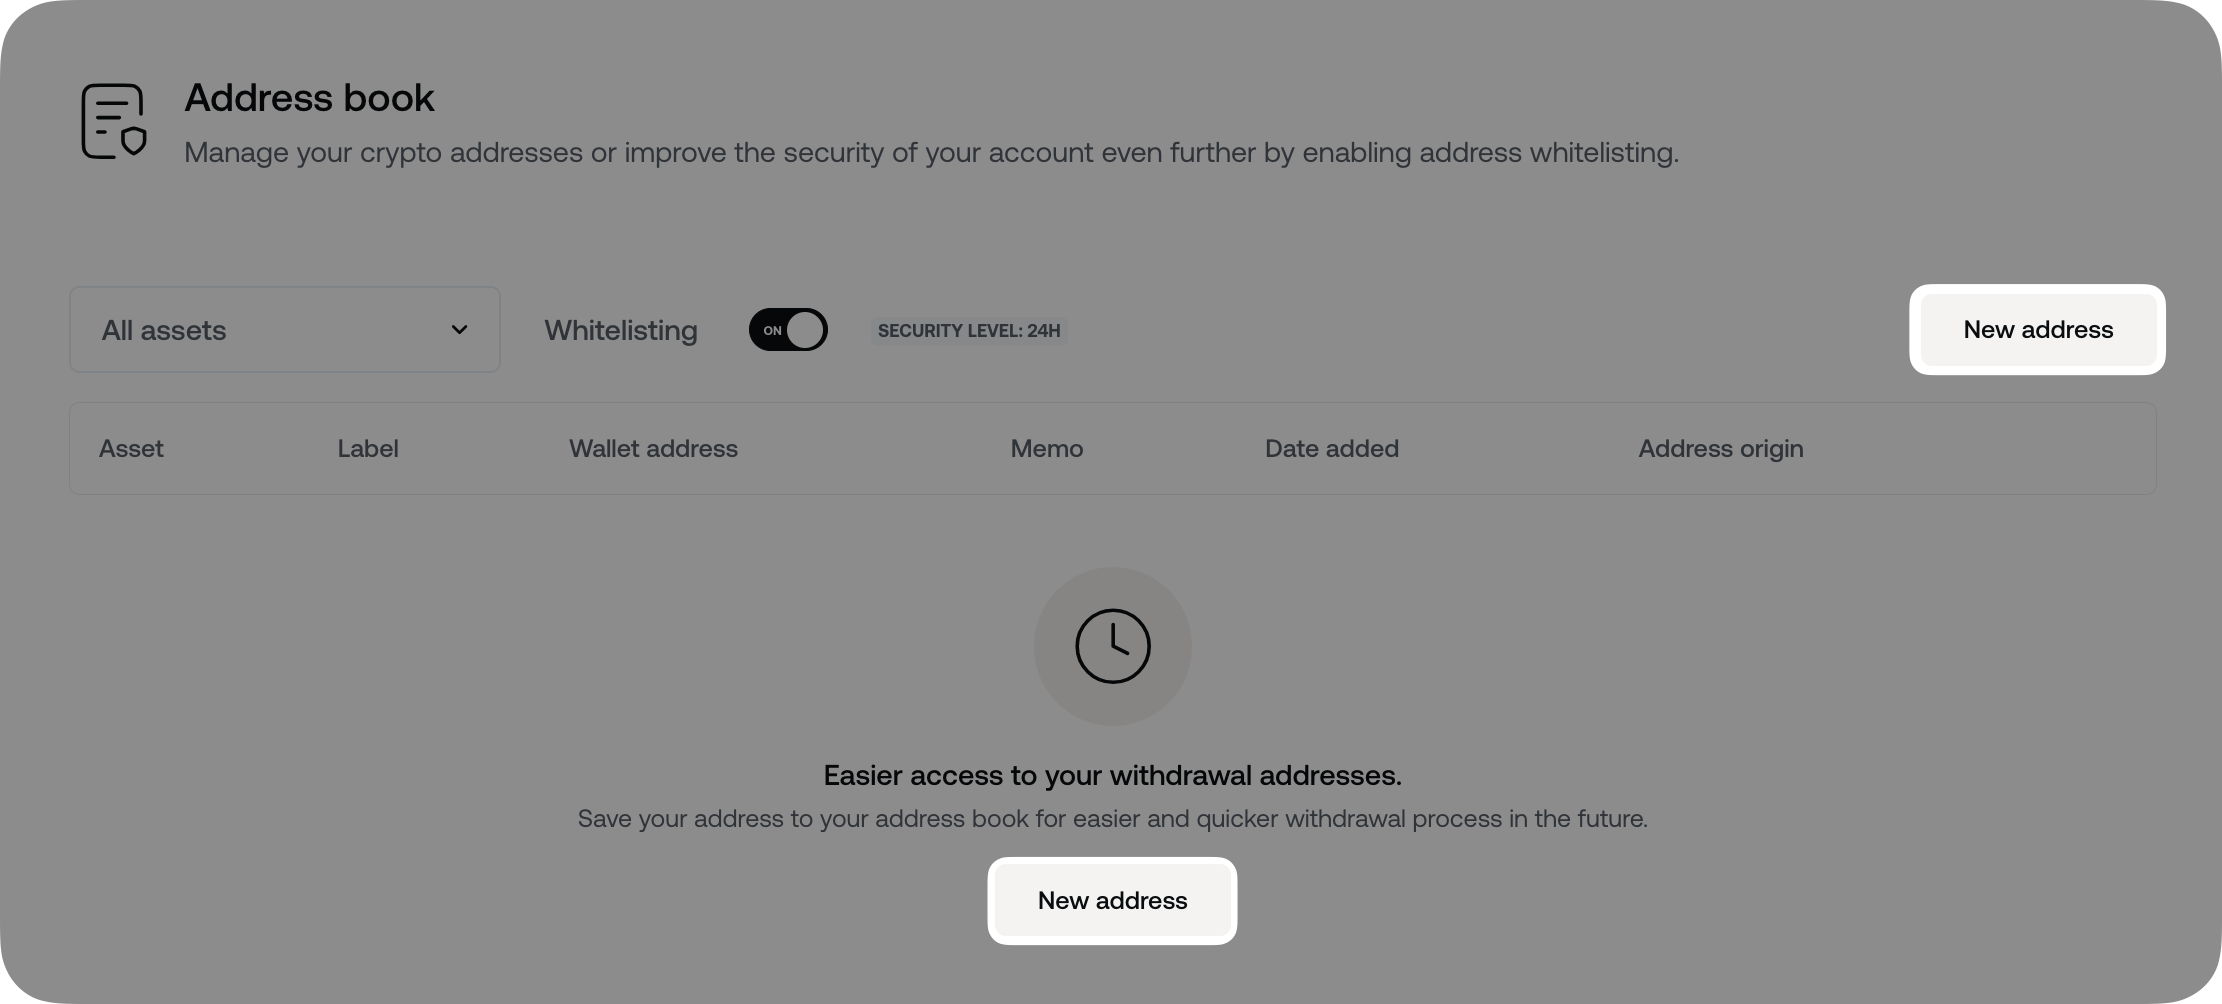
The Address Book is where you can save your withdrawal addresses for all supported crypto assets on the Nexo platform.
This feature saves you time, as you won’t need to re-enter the same address each time. There’s no limit to the number of addresses you can record. You can add both personal wallets and exchange wallets to your Address Book.
However, keep in mind that the Address Book only serves as a catalog of your preferred withdrawal addresses.
If you want to add an extra security layer by limiting withdrawals only to wallets listed in your Address Book, you need to enable the Whitelisting function.
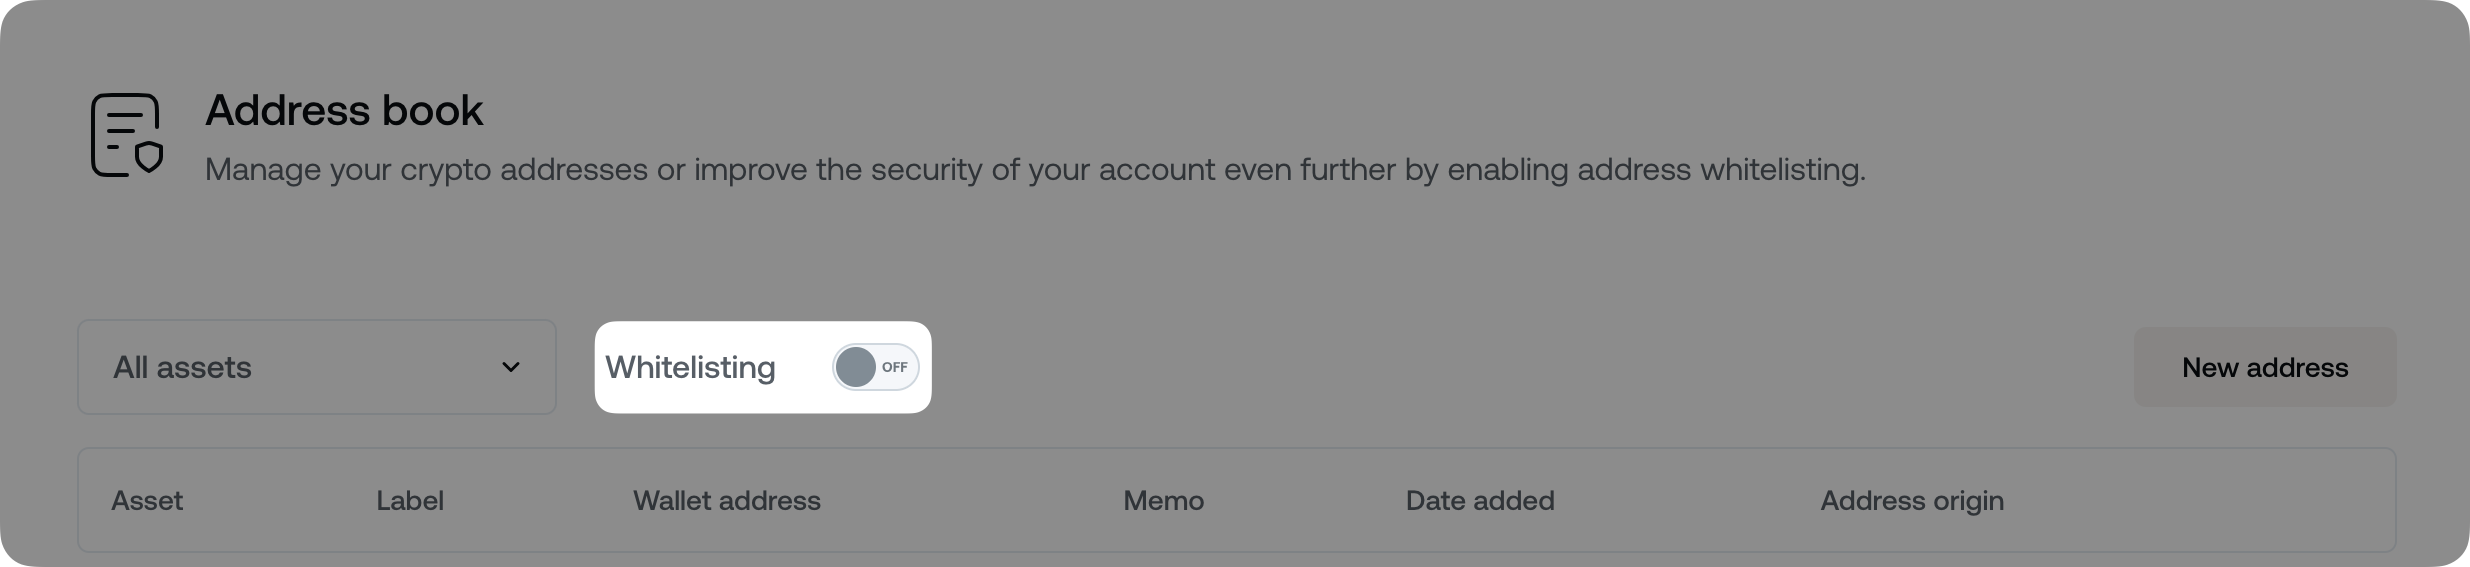
2. How to access the Address Book
Web platform
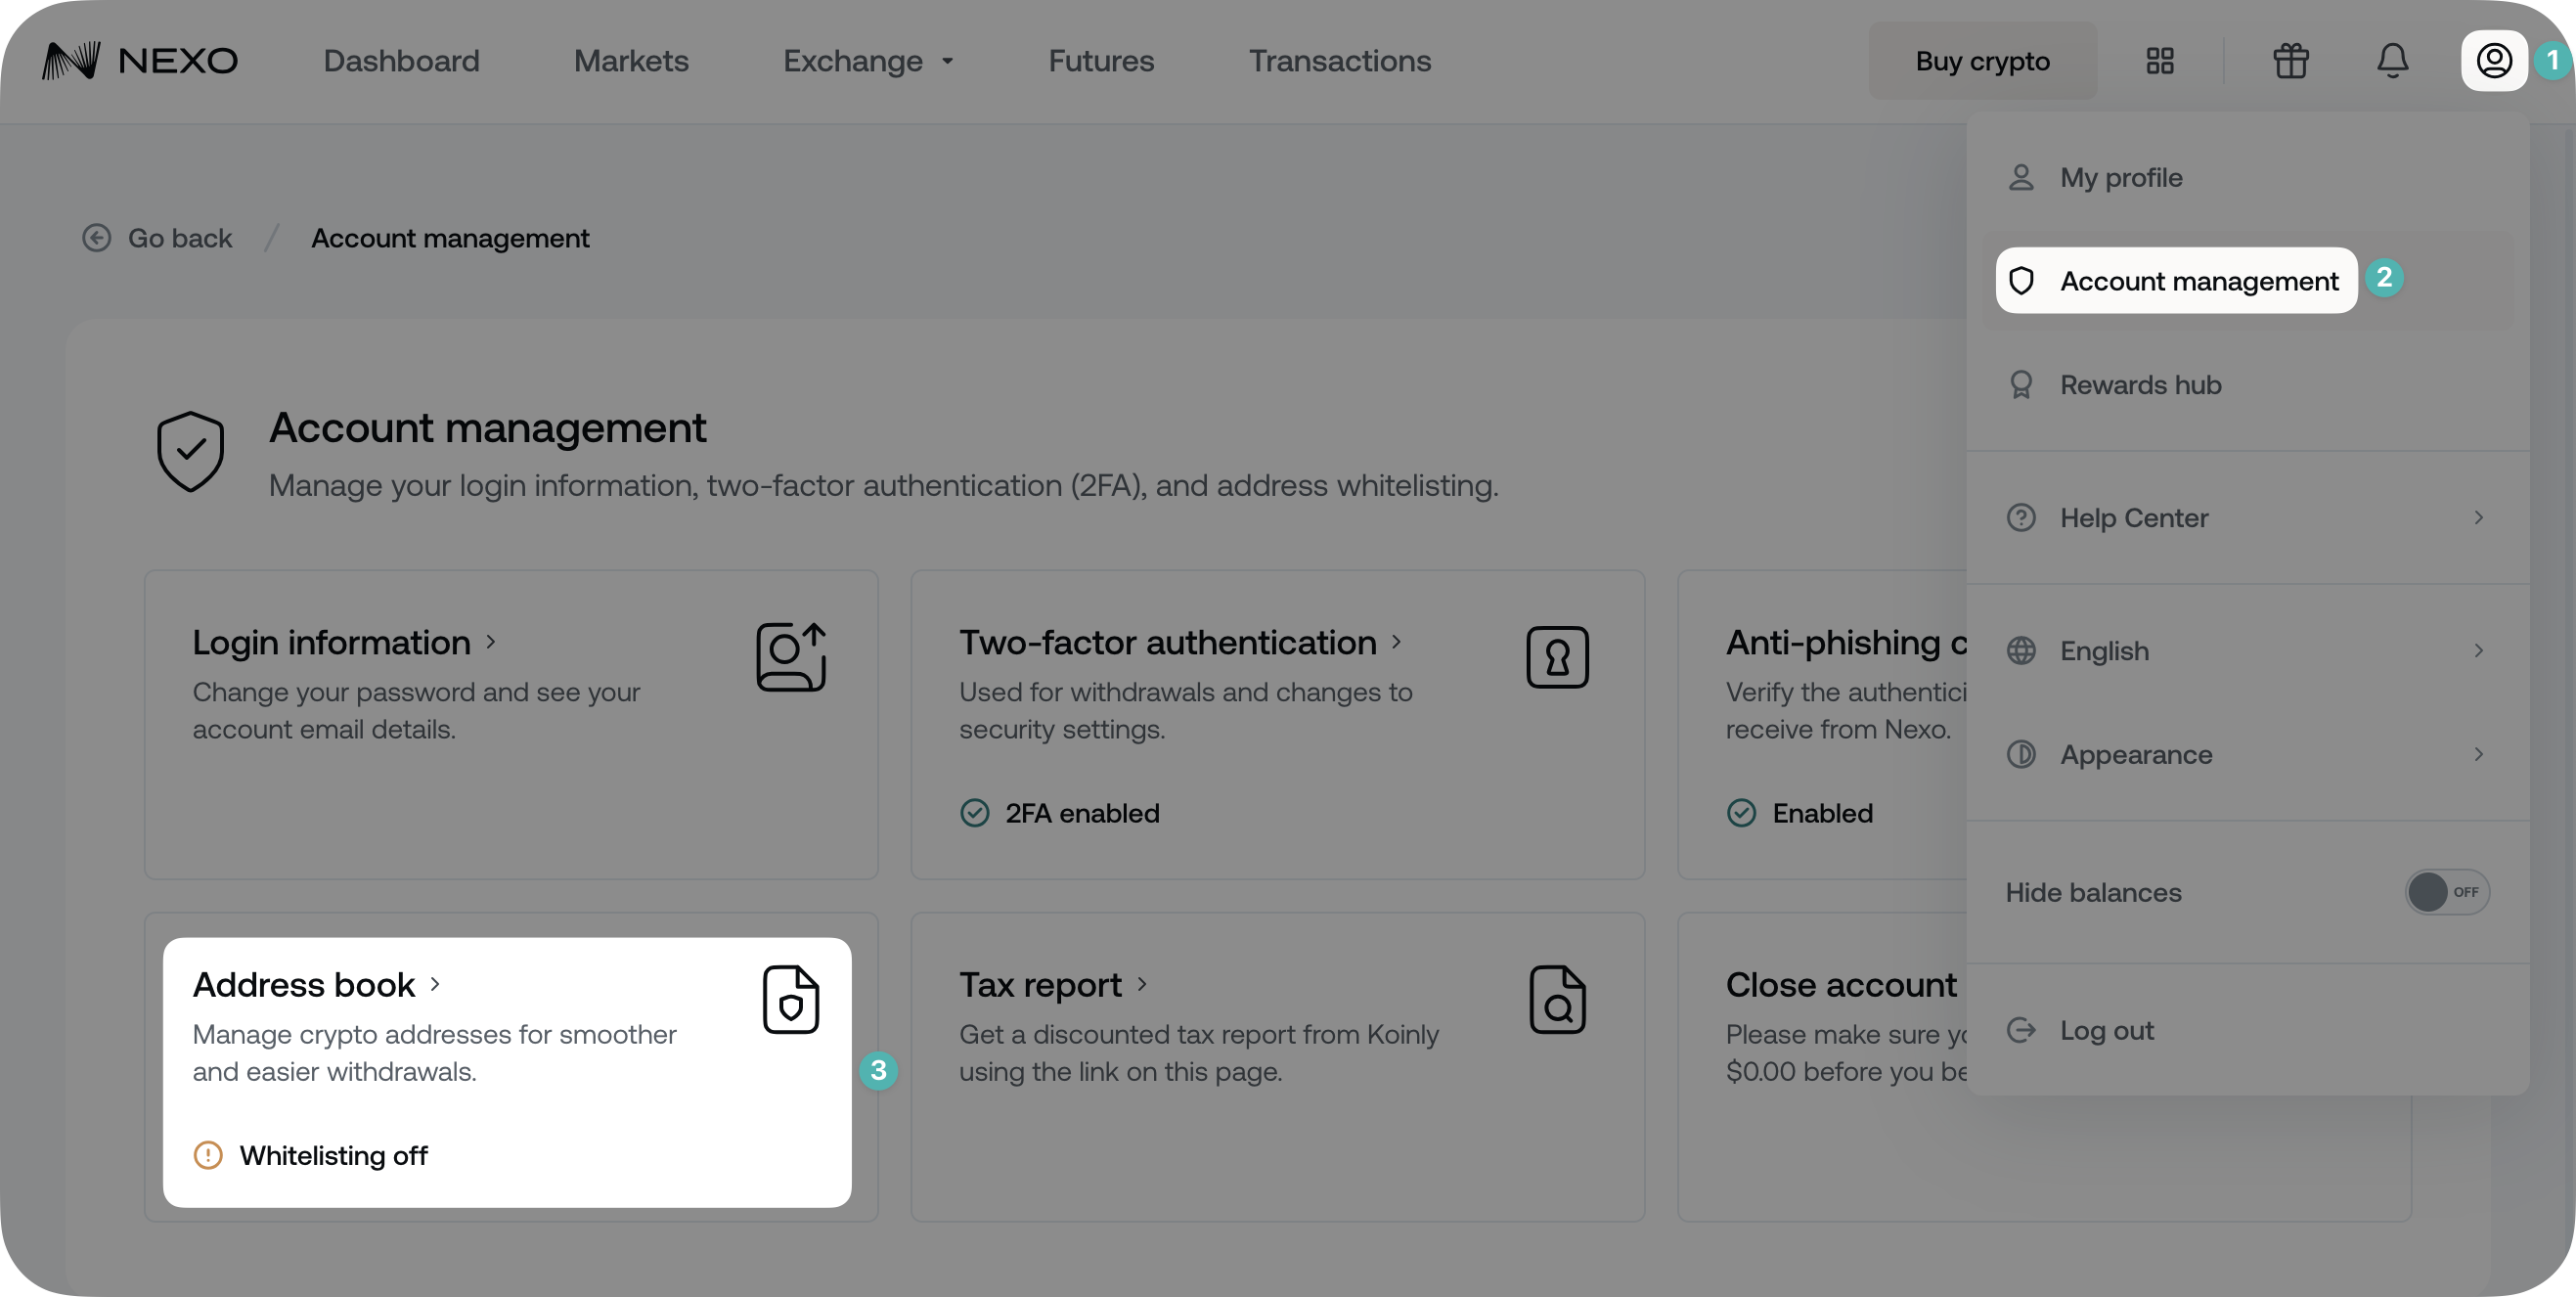
1. Navigate to the Profile icon in the top right corner, click Account management, and then Address book.
Mobile App
1. Tap the My profile icon in the top left corner and select Security.
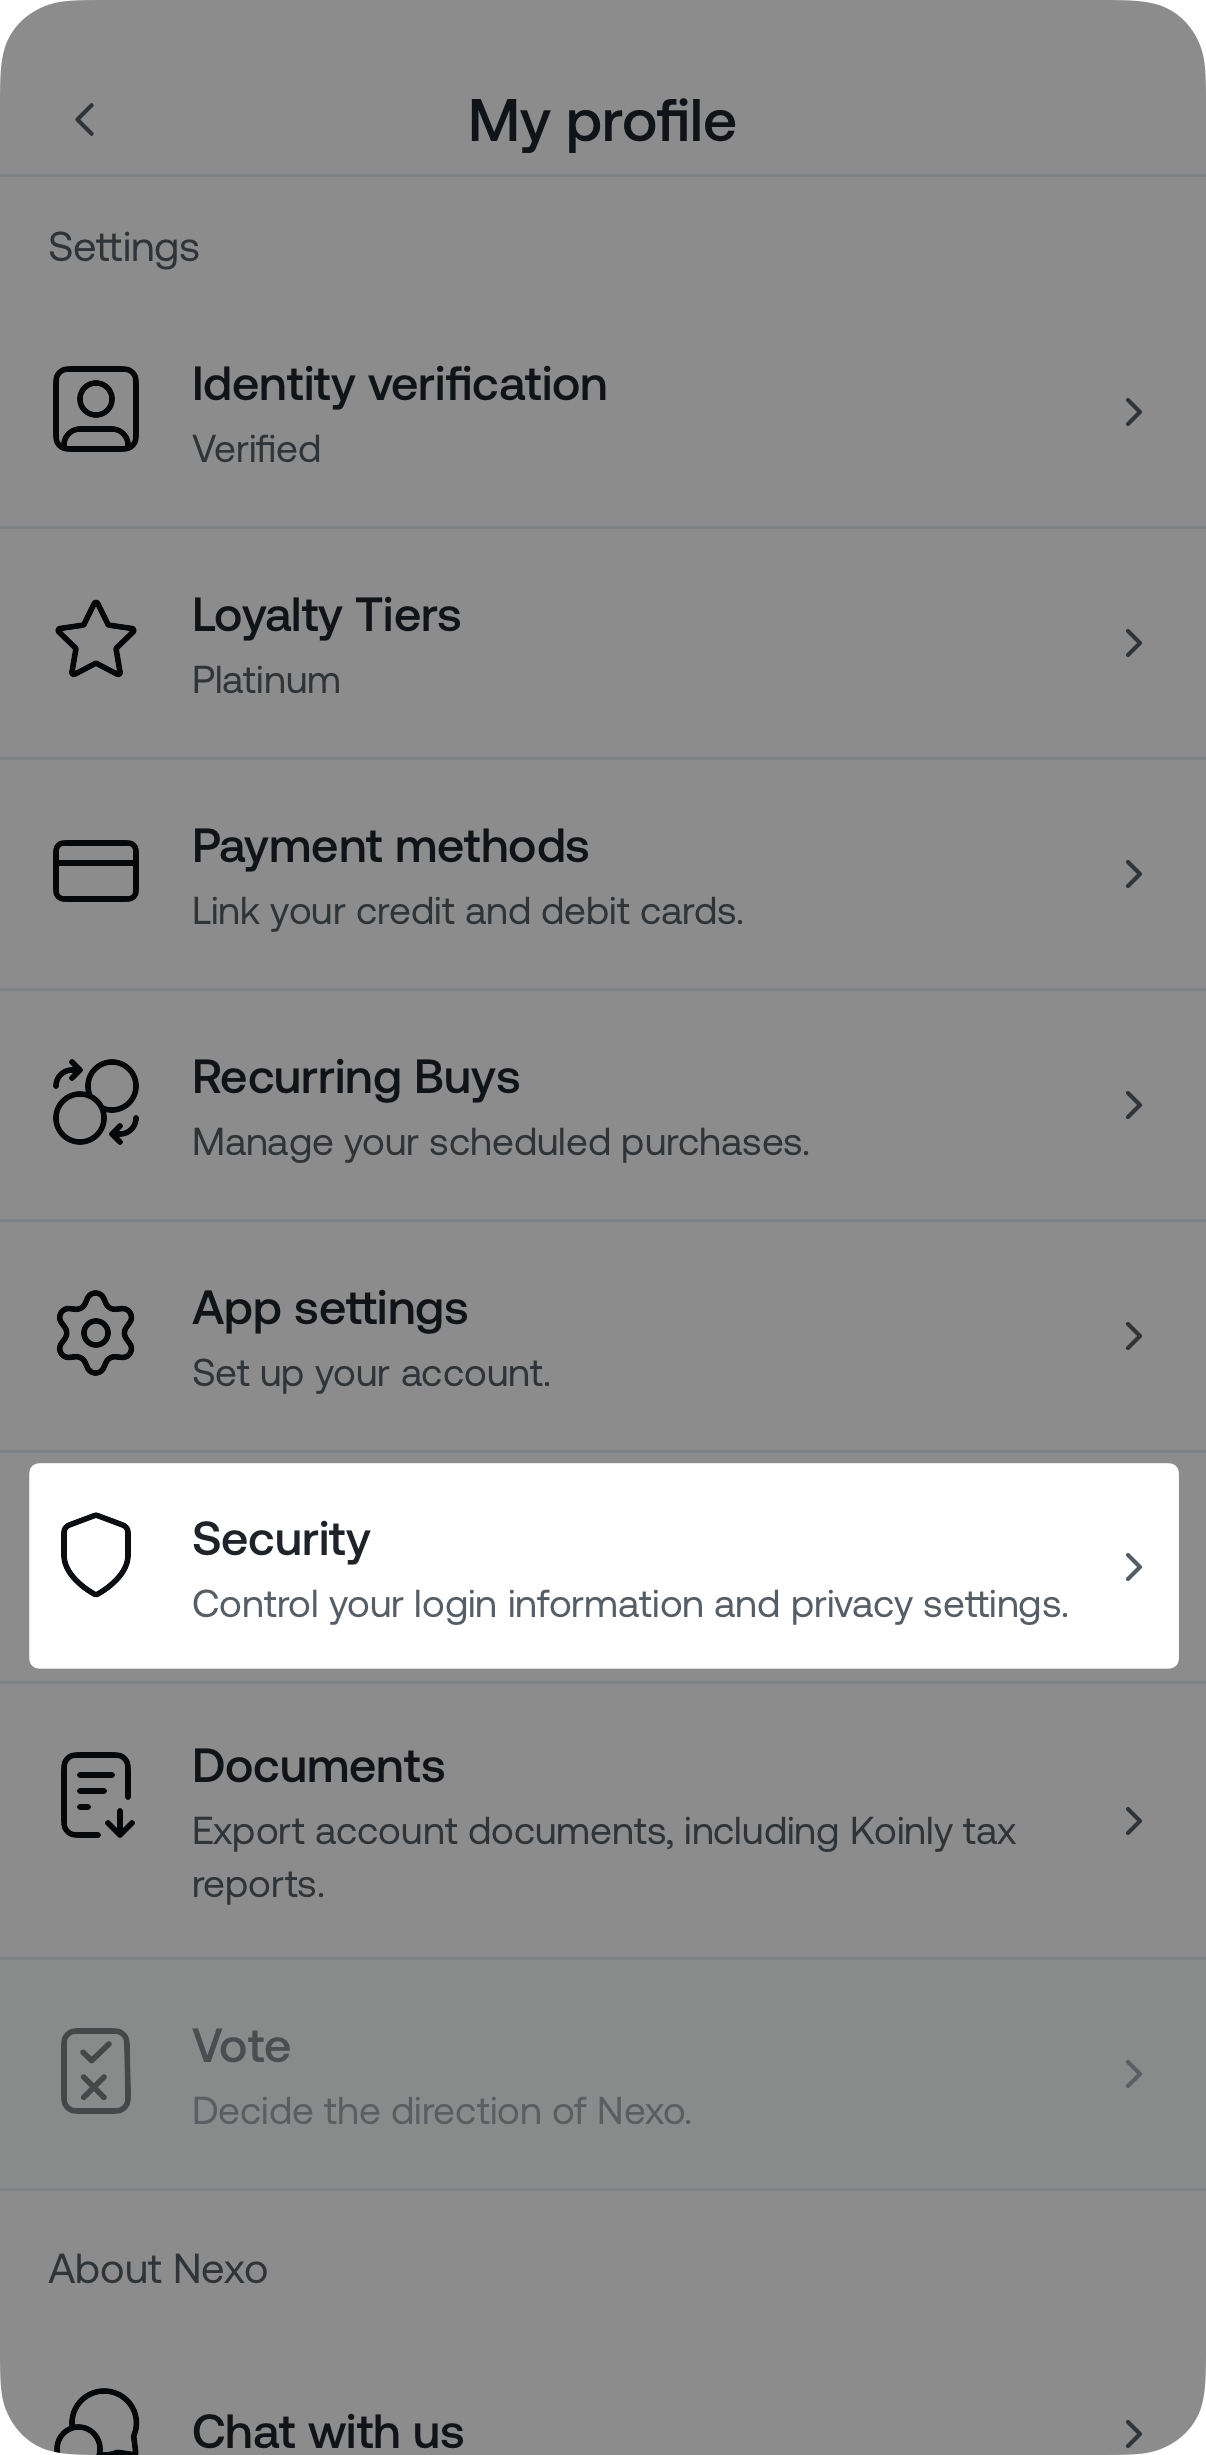
2. Tap on Address Book.
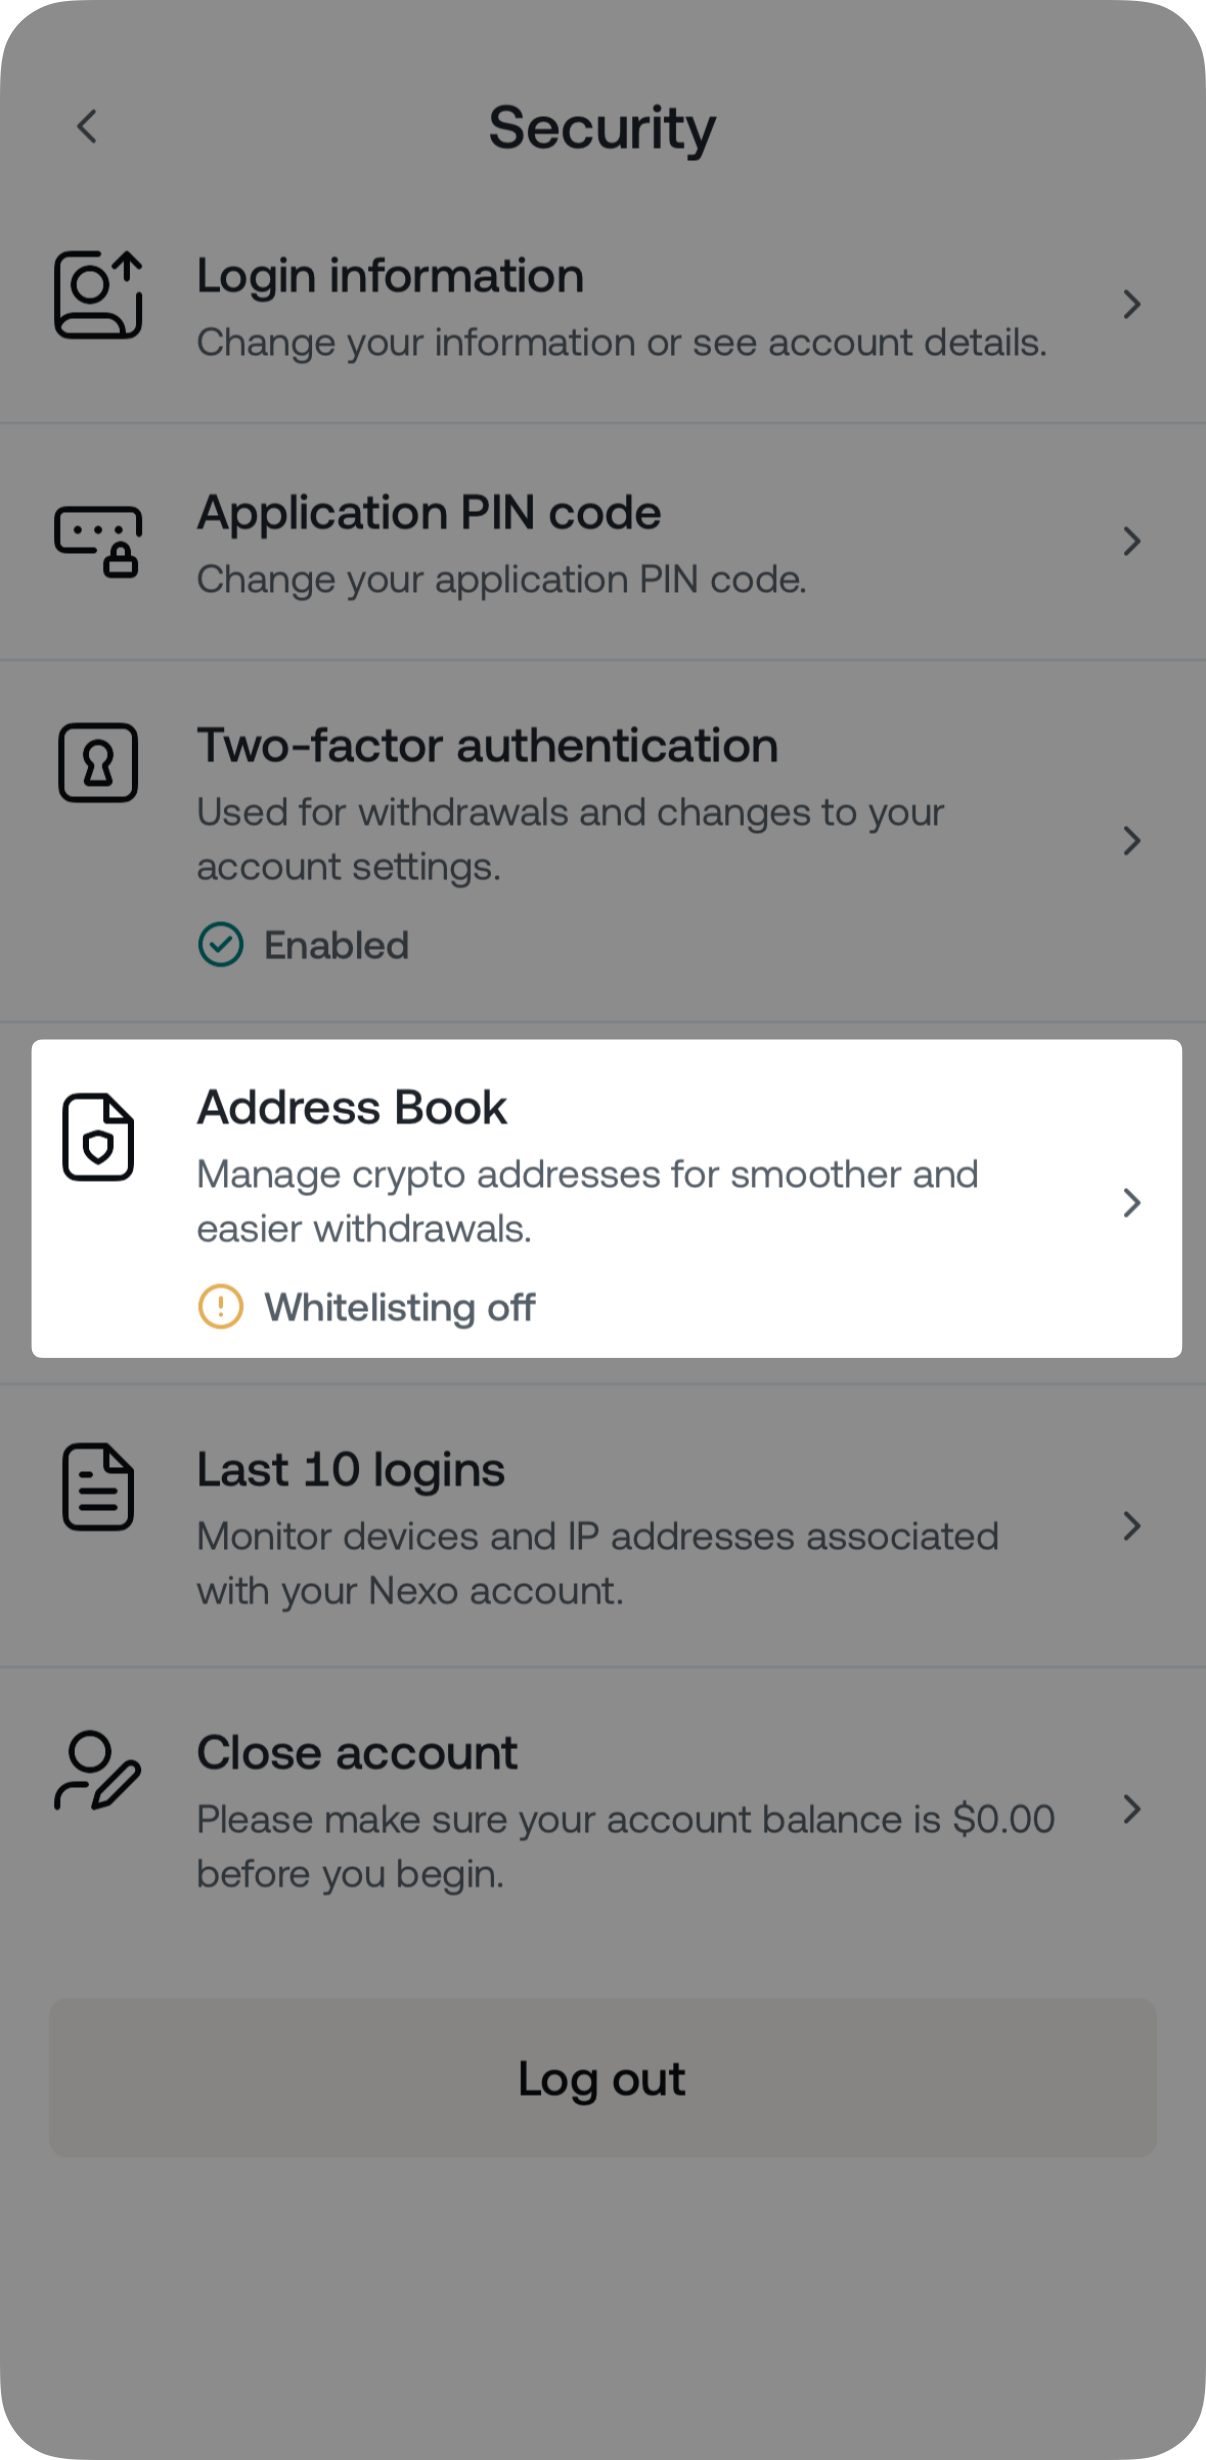
Once you access the Address Book page, you can add, remove, and edit your addresses.
3. How to add a new crypto address
The process is different depending on your Whitelisting status.
- With Whitelisting disabled or within the 4-hour cool-off window after activation:
1. Navigate to the Address Book and click one of the New address buttons.

2. Enter your wallet details and click Save changes.

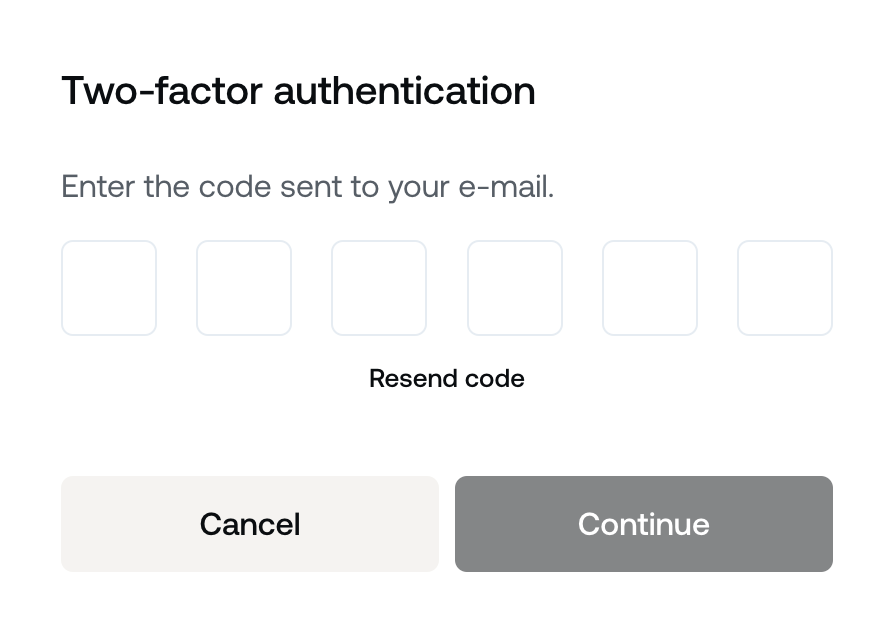
3. Enter your Two-Factor Authentication (2FA) code.
- With Whitelisting enabled:
1. Navigate to the Address Book and click one of the New address buttons.
2. Click Continue to proceed. Note that if you have set an Extra Stability level, the new address cannot be used until the respective timeframe is over.
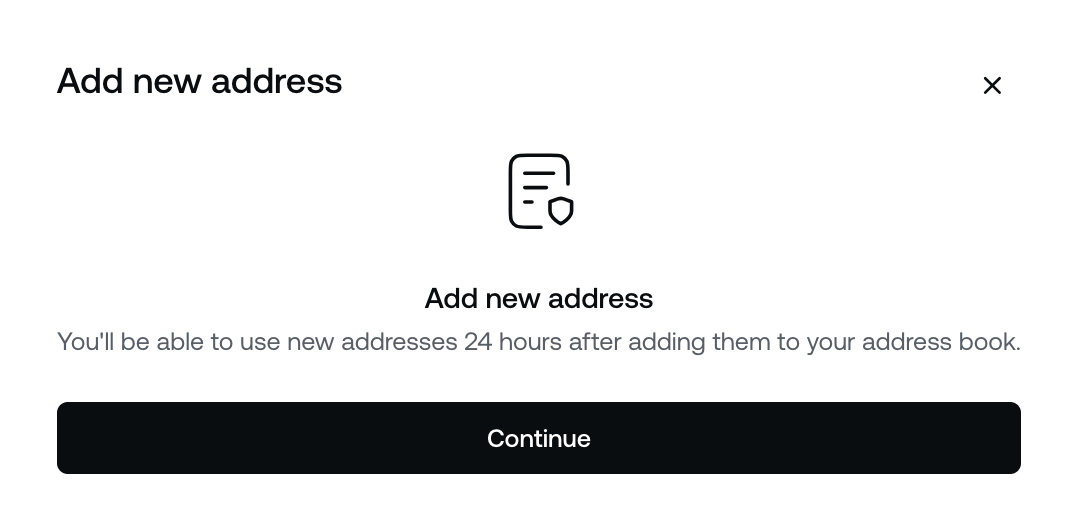
3. Enter your wallet details and click Save changes.
4. Enter your Two-Factor Authentication (2FA) code.
5. You will receive an Address whitelisting request email. Once you confirm that the address entered is correct, press Add to whitelist.
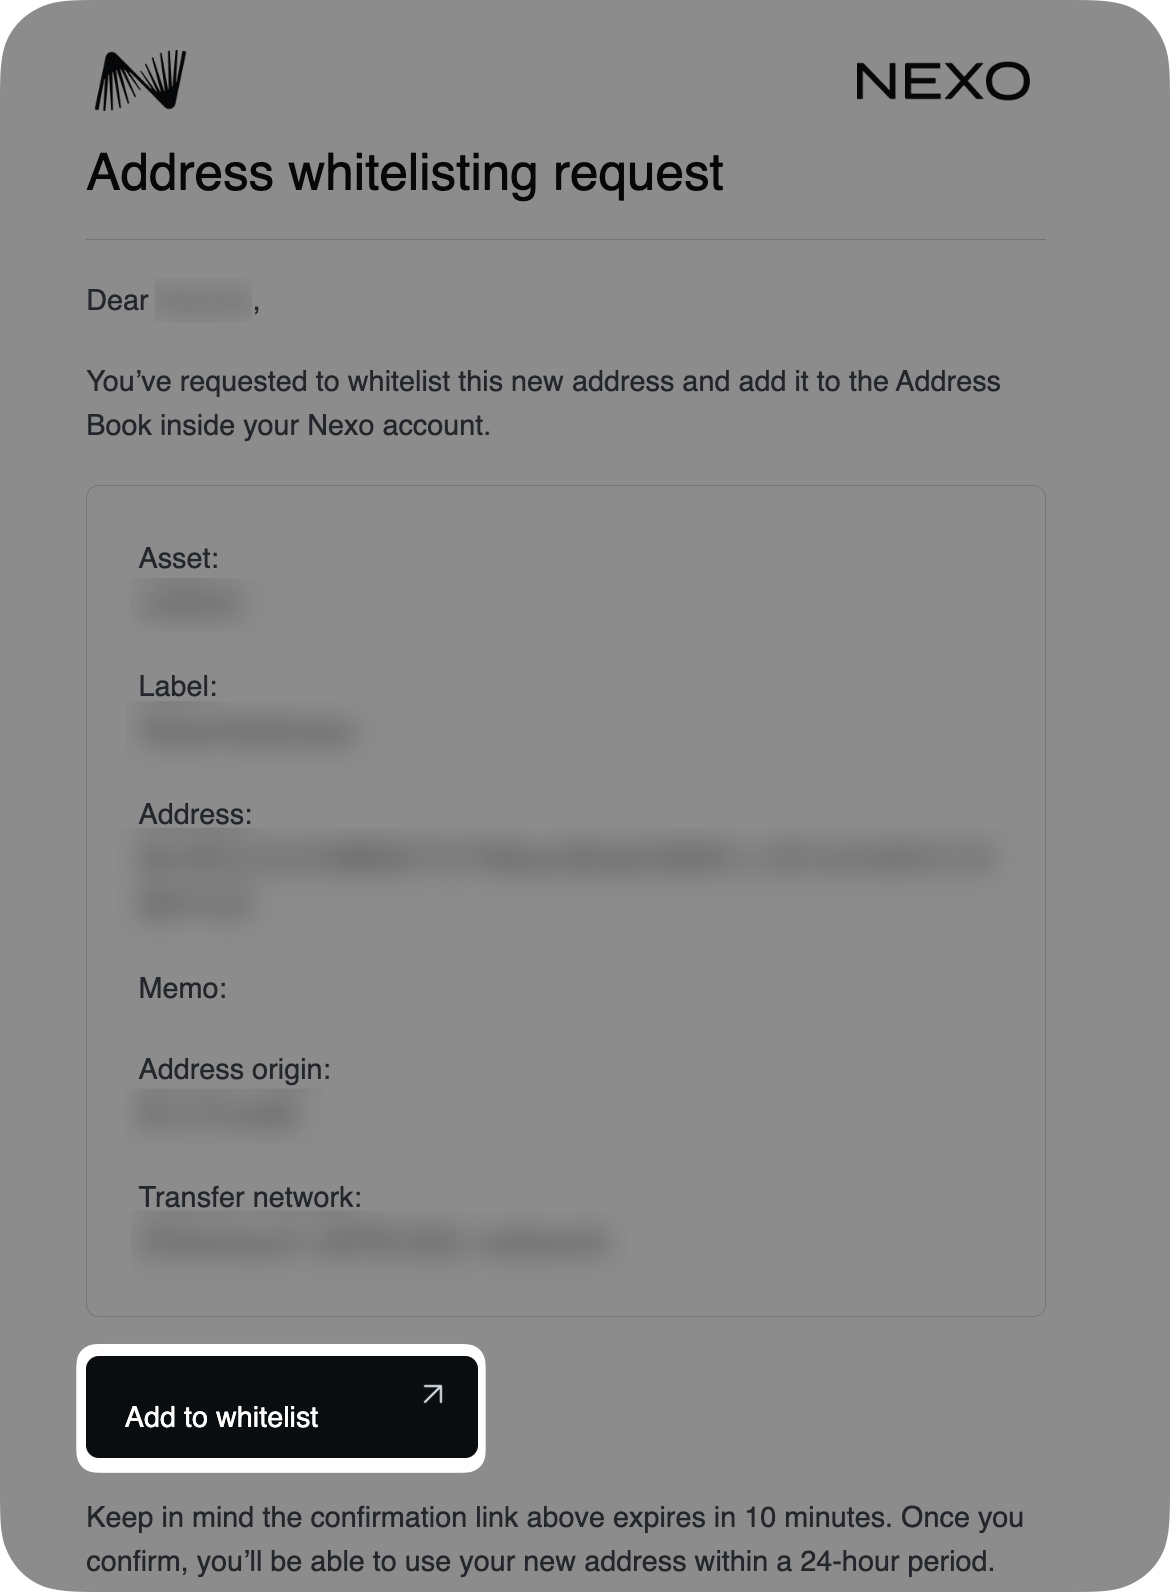
6. Bear in mind that the added address will be greyed out and become available for withdrawals only after the Extra Stability period passes.

Note: If you plan to transfer crypto to exchanges or shared wallets, a MEMO or a Destination Tag may be needed for assets such as XRP, XLM, and others.
Bear in mind that if you have Whitelisting enabled, you cannot add or edit a MEMO/Destination Tag to your saved crypto address when initiating a withdrawal.
4. How to edit an existing crypto address
1. Click the pencil icon next to the wallet you want to edit.

2. Make the desired changes to the Label, Address Origin fields, and the Exchange/Wallet name drop-down menu and click Save changes.
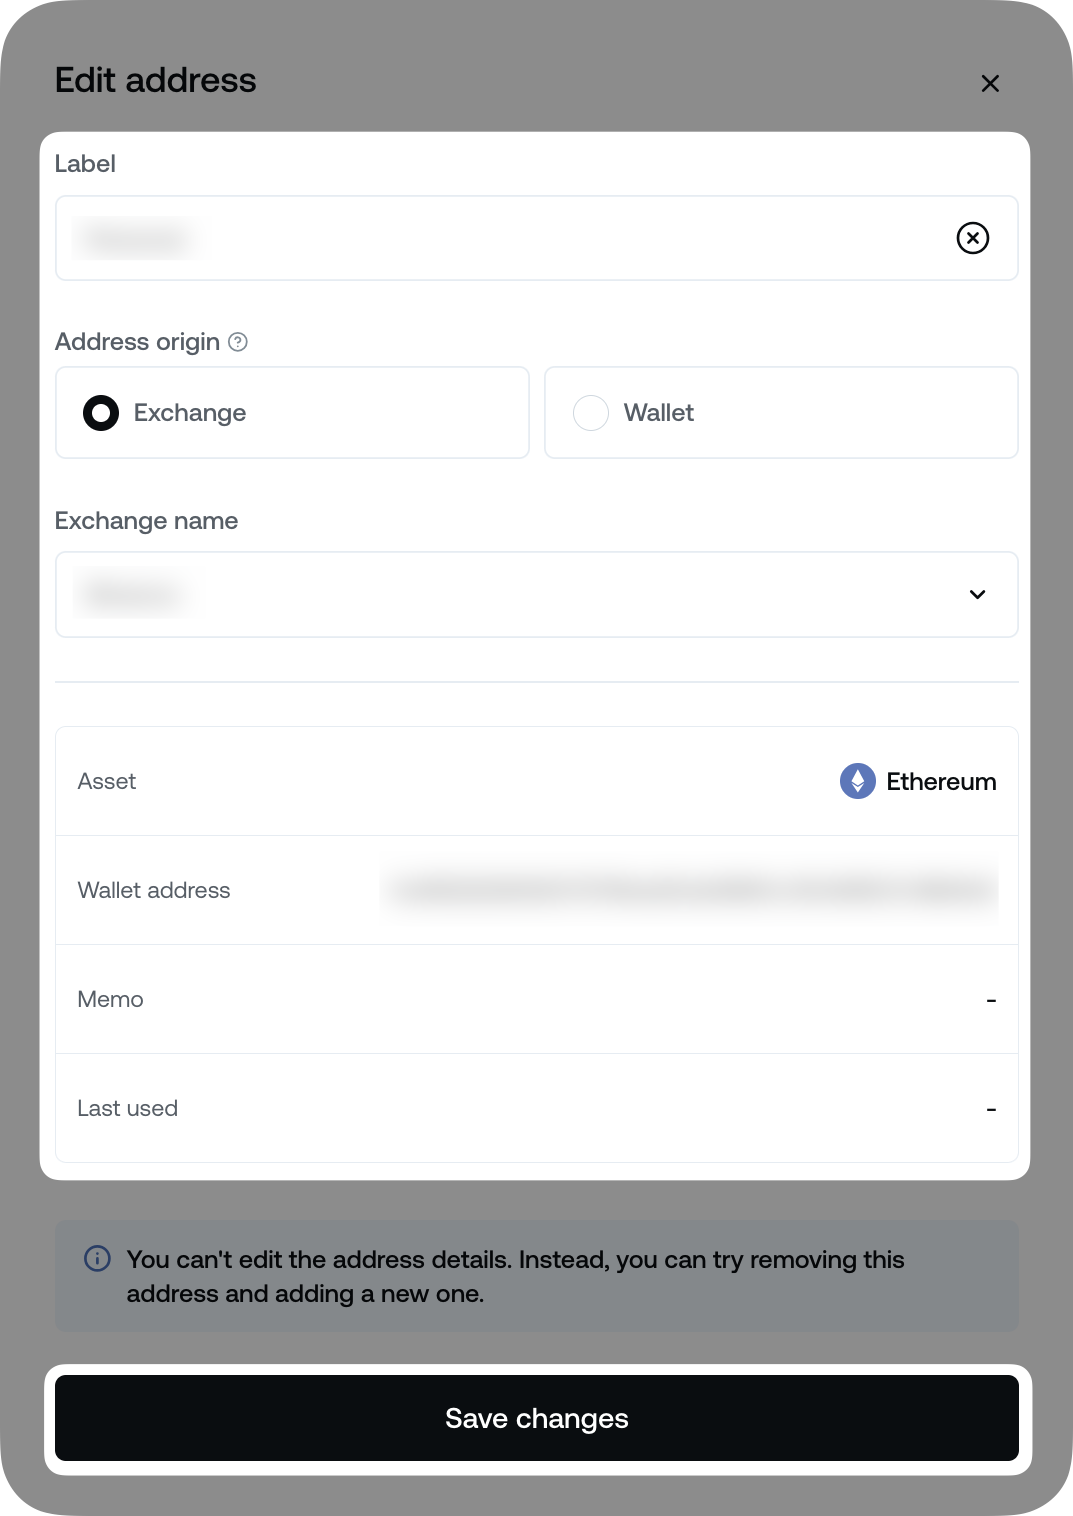
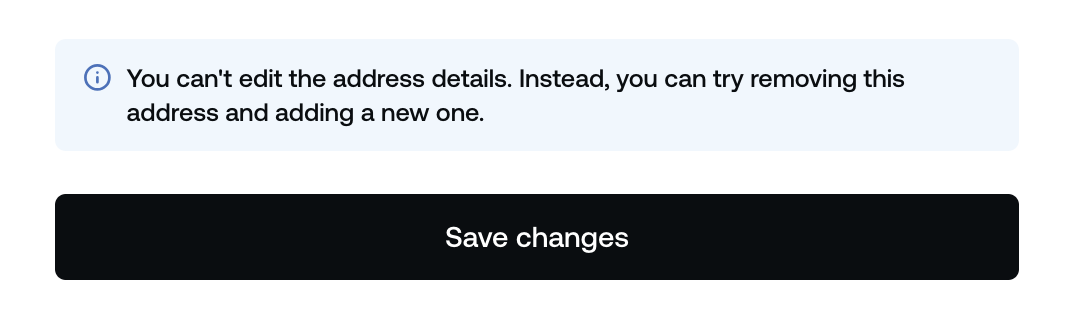
Note: While you cannot edit the address itself, you can modify its Label and Address Origin. If you need to change the address completely, simply remove the current one and add a new address.
5. How to remove a crypto address
1. Click the bin icon next to the wallet you want to delete.

2. Confirm your decision by clicking Remove.

Important: If you have enabled Whitelisting and the 4-hour cool-off period has passed, you can re-add the same address only after the preset Extra Stability time has elapsed. A warning message will appear on the screen.
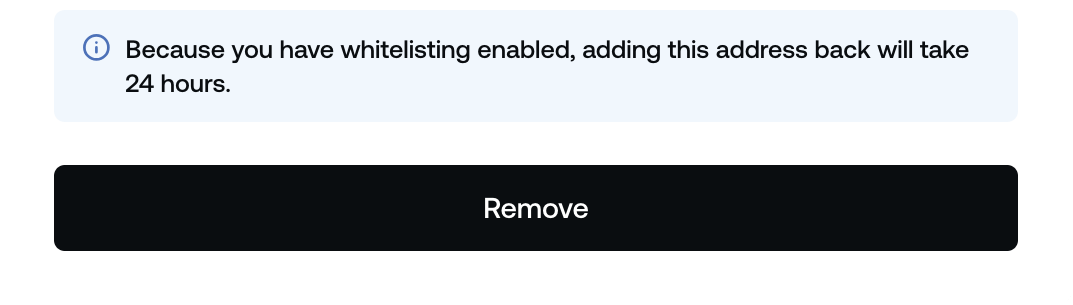
3. Enter your Two-factor authentication (2FA) code.
Whitelisting
1. Overview
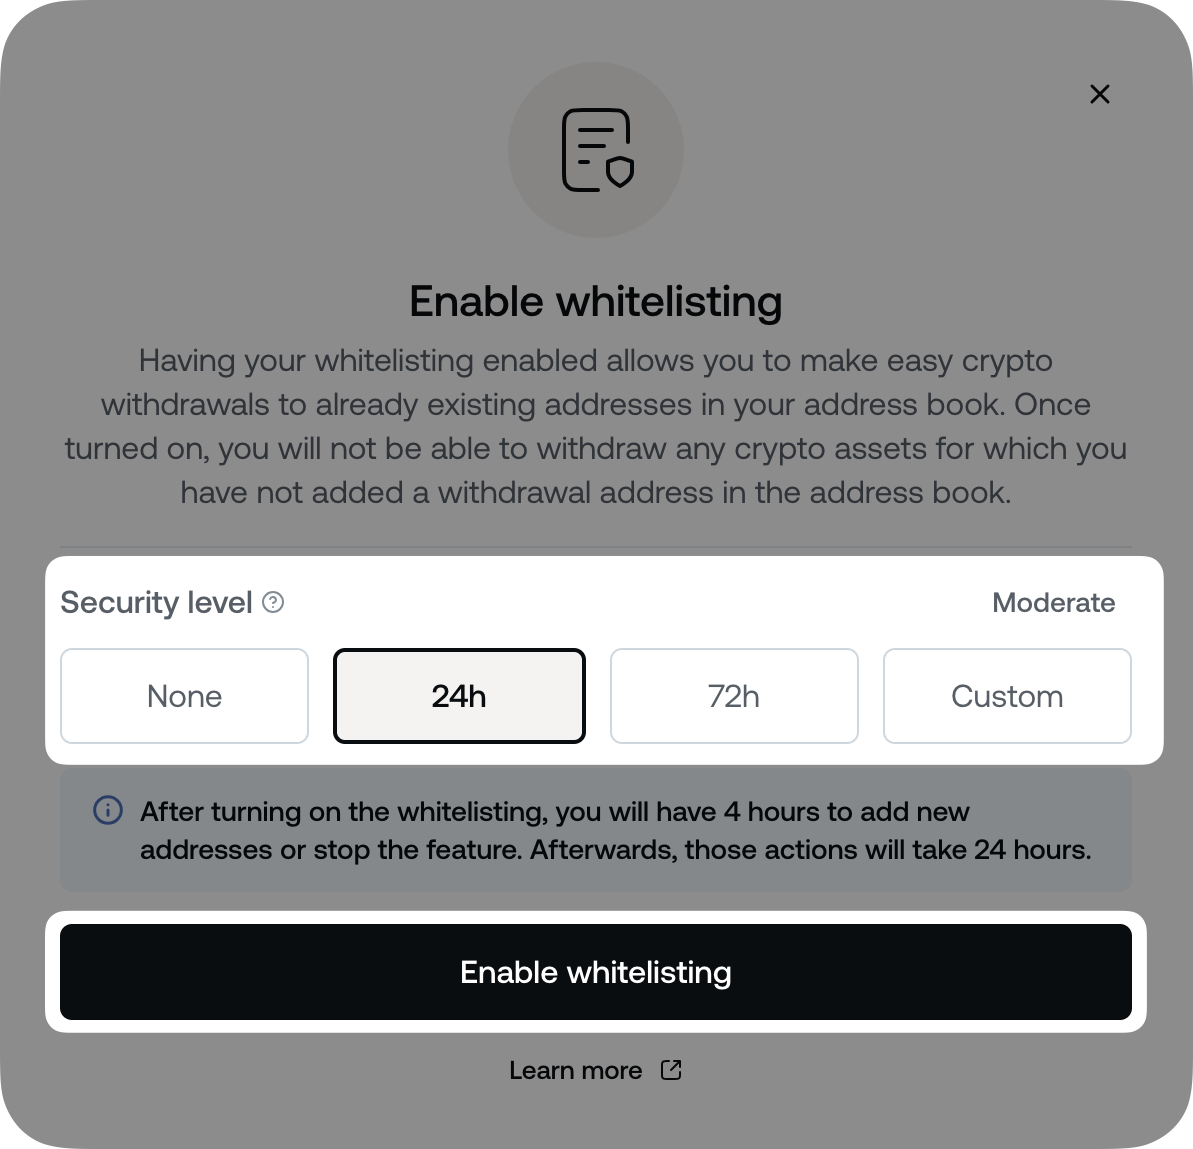
To add an extra security layer by limiting withdrawals only to wallets listed in your Address Book, you can enable the Whitelisting function.
Upon enabling it, you can choose an Extra Stability Level delay. This feature lets you select the length of the security delay for making any changes within the Whitelisting setup – like adding new addresses or disabling Whitelisting altogether.
You can choose between three preset options – None, 24h, 72h, or you can enter a Custom timeframe that best suits your needs. It can be as short as 5 hours or as long as 10,000 hours.
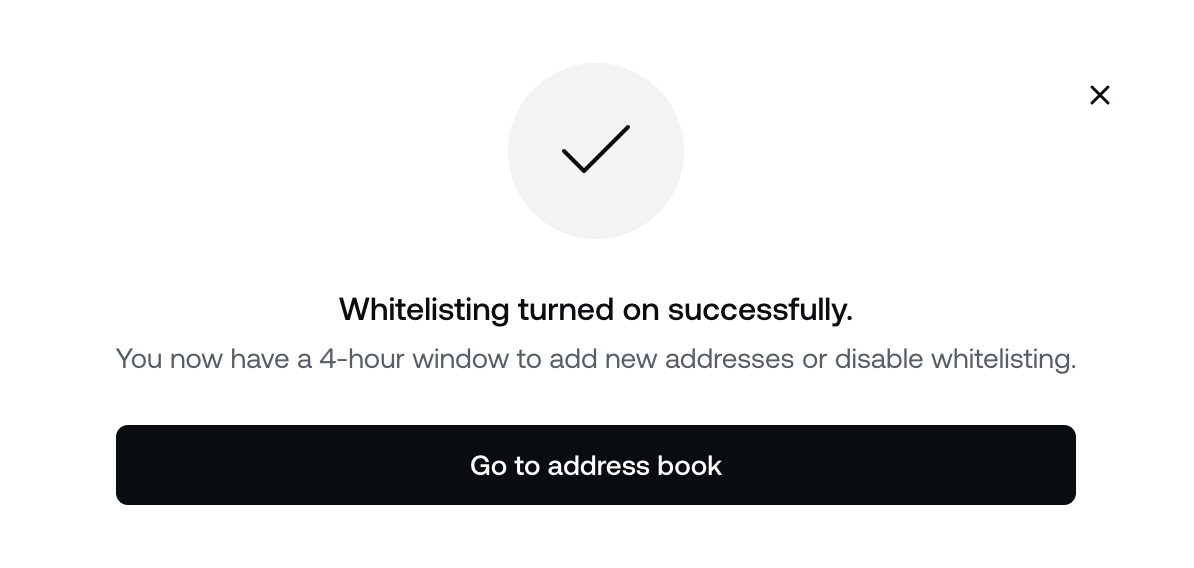
Once Whitelisting is activated, you have a 4-hour cool-off window to add new addresses or disable Whitelisting. After this period ends, you have to wait for the preset Extra Stability Level delay to pass before any changes you make take effect.
Important:
- The Whitelisting option applies to the entire portfolio and all supported crypto assets. If it’s turned ON, you can only withdraw to the addresses in your Address Book.
- You will not be able to withdraw assets for which you haven’t added a withdrawal address in the Address Book.
- Ensure you have added all necessary wallet addresses before enabling Whitelisting or within the 4-hour cool-off period.
- If you haven’t done so, you can still whitelist an address, but you’ll need to disable Whitelisting and wait for the Extra Stability timeframe to pass (if any has been set) or contact the Client Care team for assistance.
2. How to enable Whitelisting
To turn the Whitelisting feature ON, you must first access the Address Book page.
1. Click the Whitelisting slider to turn the feature ON.
2. Choose a preset Extra Stability Level (24h or 72h), click Custom to enter a different timeframe, or select None to bypass this setting.
Click Enable whitelisting to proceed.
3. Enter your Two-factor authentication (2FA) code.
4. Once you enable the Whitelisting, you will receive a confirmation message on the screen.
3. How to disable Whitelisting
To turn the Whitelisting feature OFF, you must first access the Address Book page.
- If you have not set an Extra Stability Level or if you have set one but the 4-hour cool-off period has not passed, you can turn the Whitelisting feature OFF by following these steps:
1. Click the Whitelisting toggle.

2. Confirm your decision by clicking Disable whitelisting.
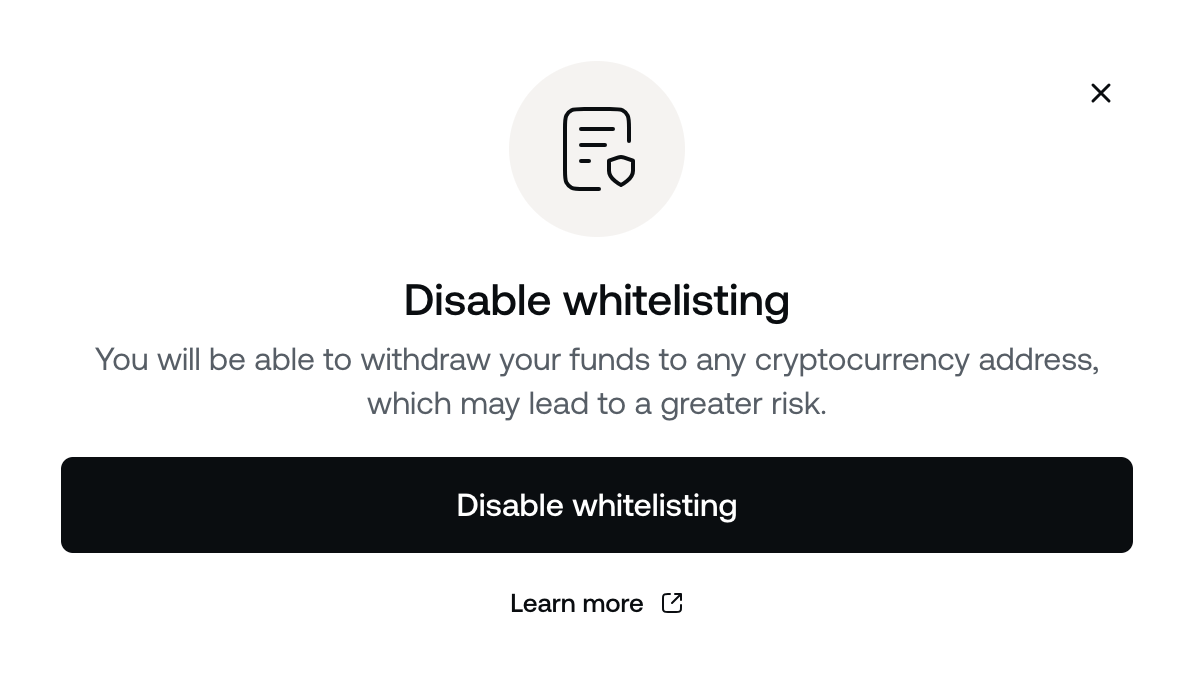
3. Enter your Two-factor authentication (2FA) code.
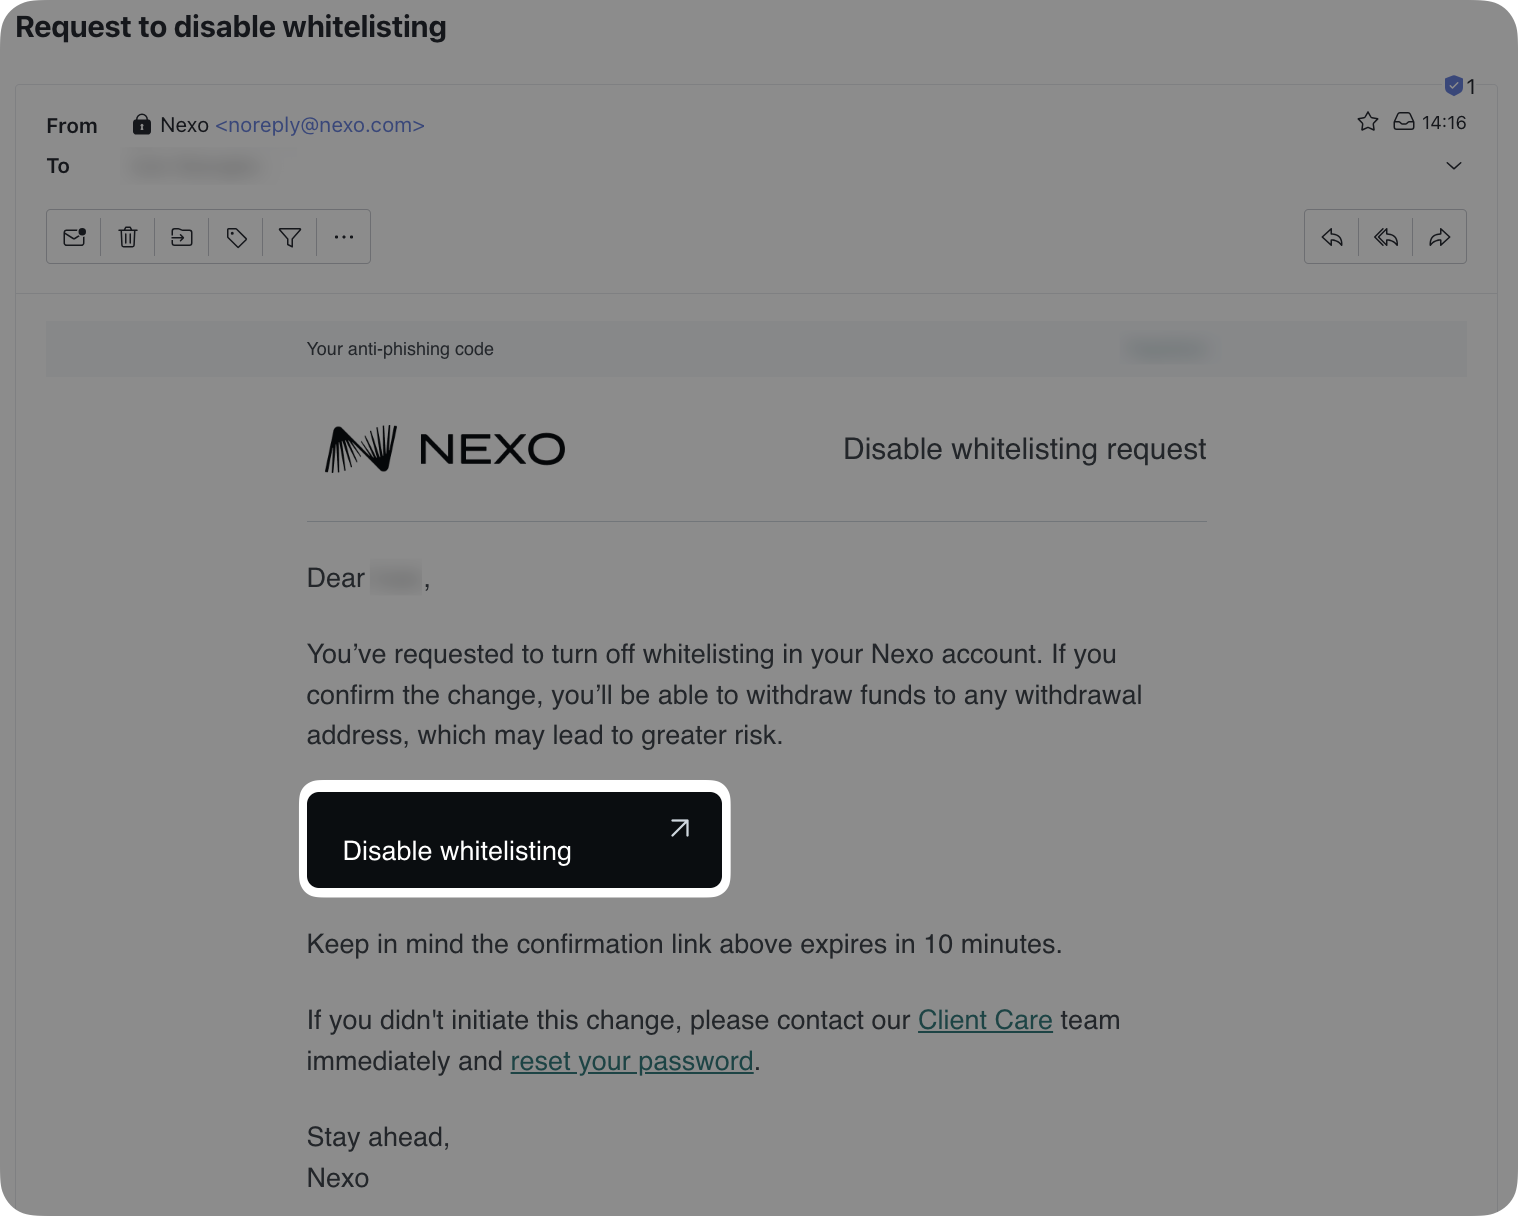
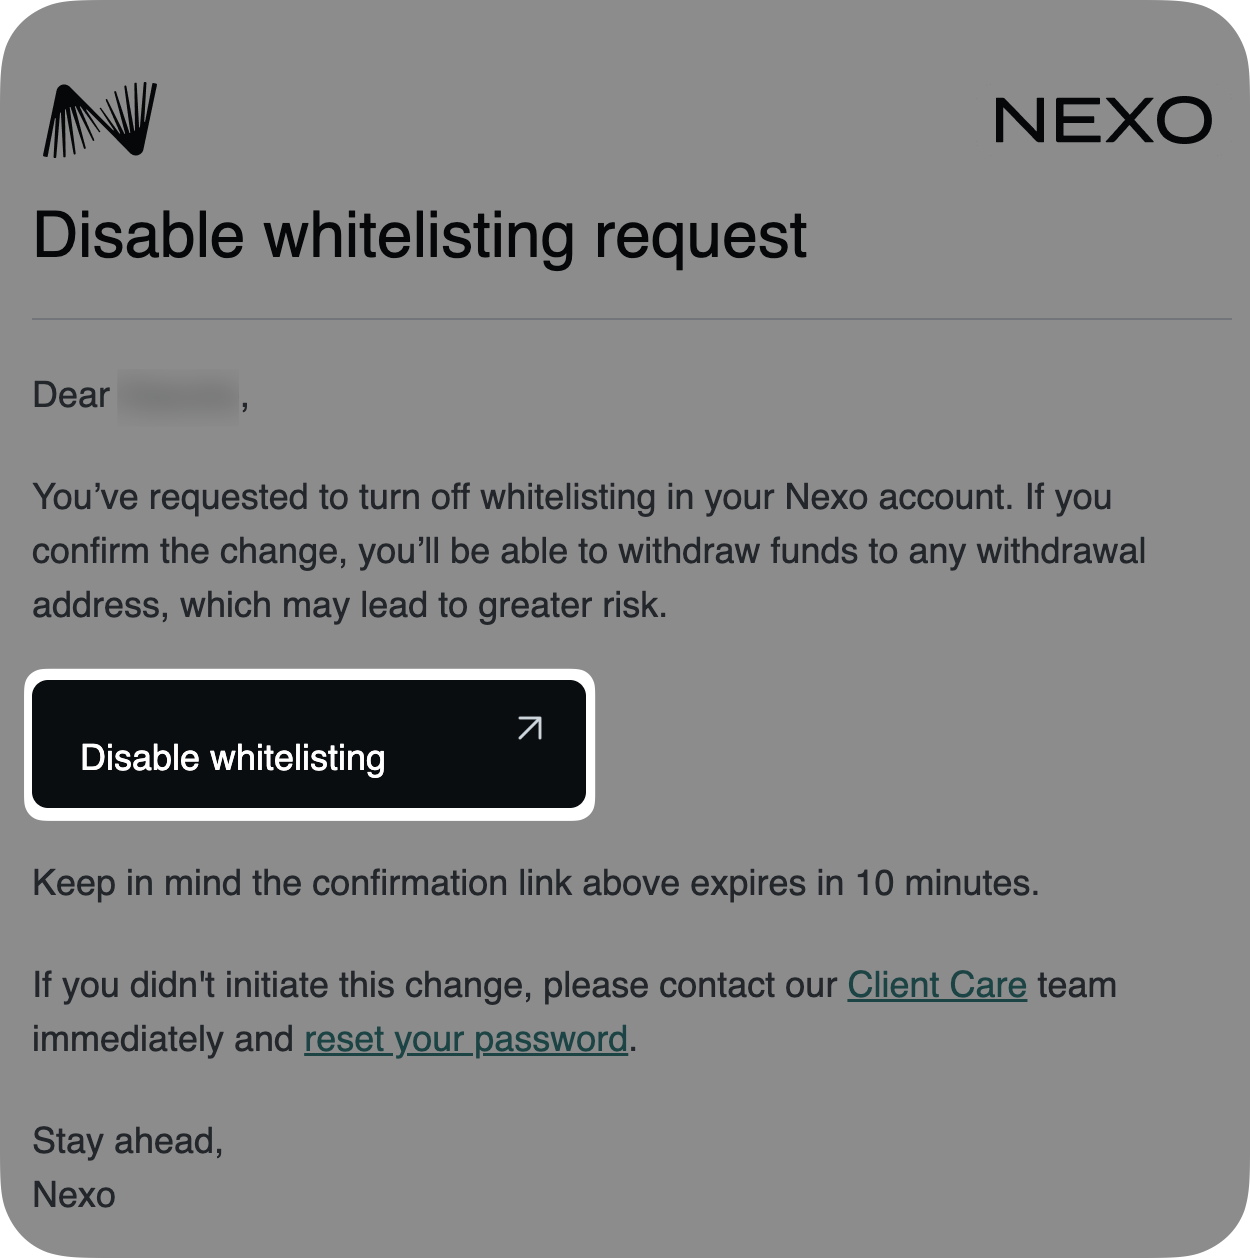
4. A confirmation email will be sent to your Nexo registered email address. You must confirm your decision by clicking Disable whitelisting within 10 minutes, or the email will expire.
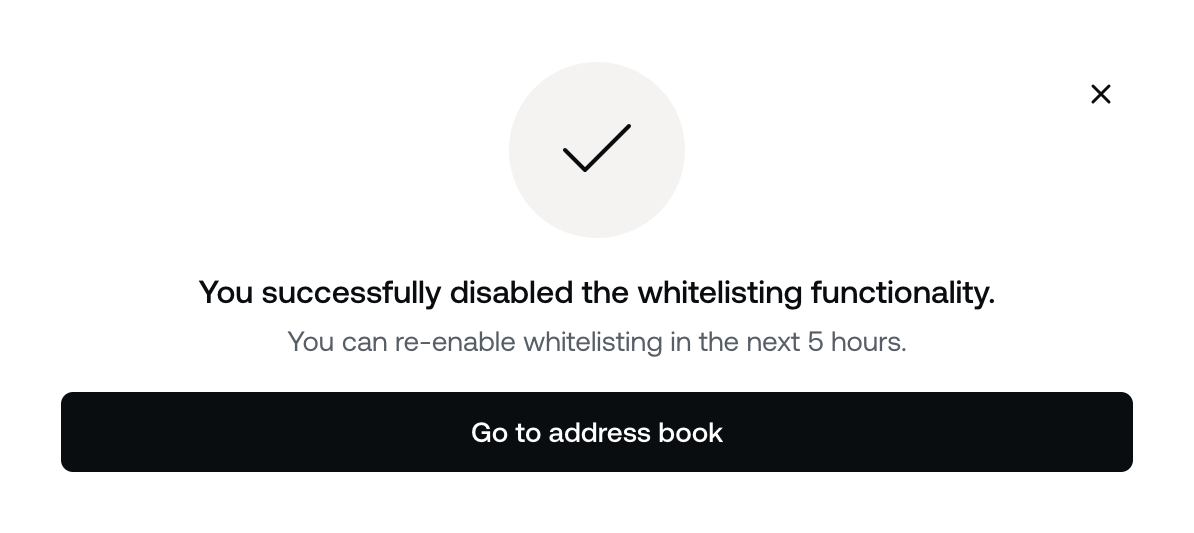
5. Once you disable the Whitelisting, you will receive a confirmation message on the screen.
- If you have set an Extra Stability Level, and the 4-hour cool-off period has passed, Whitelisting can only be turned off after the respective timeframe is over:
1. Click the Whitelisting toggle.

2. Confirm your decision by clicking Disable whitelisting.
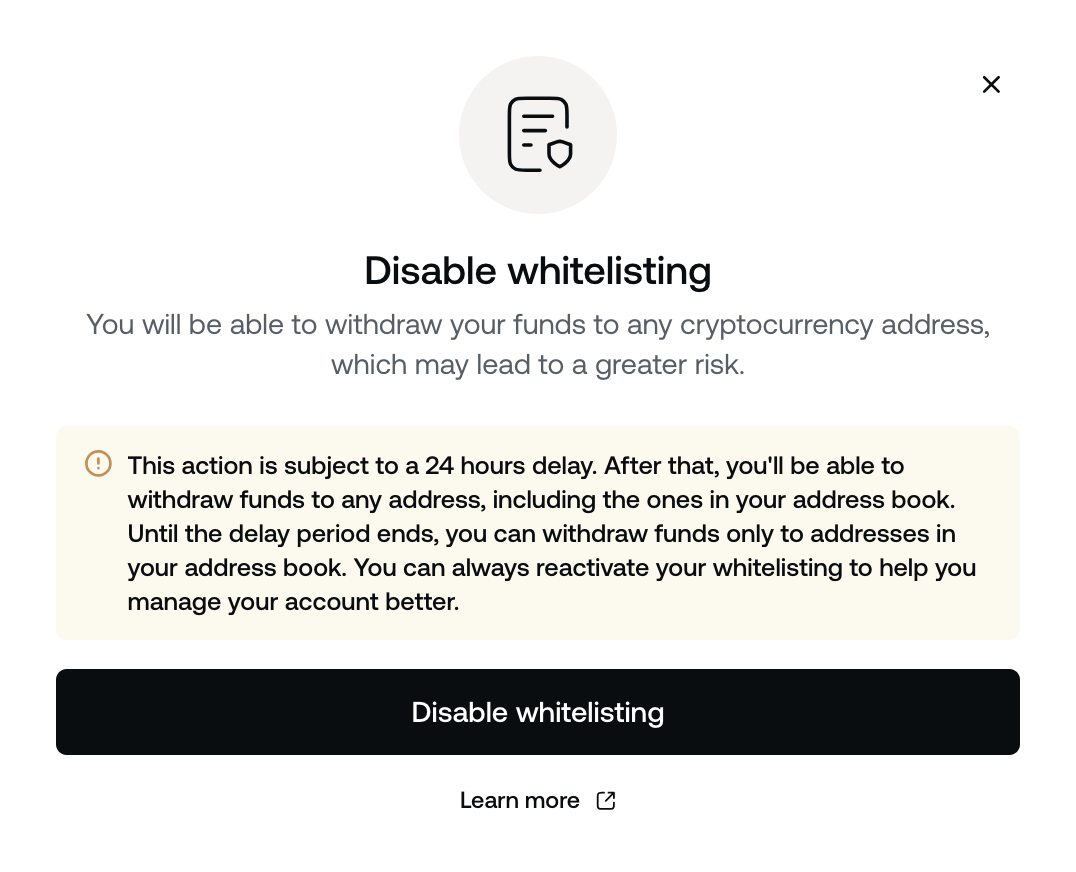
3. Enter your Two-factor authentication (2FA) code.
4. A Disable whitelisting request email will be sent to your Nexo registered email address. You must confirm your decision by clicking Disable whitelisting within 10 minutes, or the email will expire.
5. A Turning off status will appear next to the Whitelisting toggle until the Extra Stability Level period expires. ‘
During the countdown, as visible next to the toggle, Whitelisting will remain active.

Note: You can re-enable the Whitelisting option without waiting for the Extra Stability time to pass by clicking the Whitelisting toggle again.